
Key Highlights
- The DTF transfer process involves printing, powdering, curing, and pressing.
- Following a proper DTF transfer Step-by-Step ensures consistent results.
- Correct recommended DTF heat settings improve durability and finish.
- Understanding curing DTF inks explained helps avoid print damage.
- Proper DTF prints finishing gives a professional, long lasting look.
If you’re new to DTF printing, one question naturally comes up: how do DTF transfers work? At first, it might seem technical, but once you understand the flow, it becomes surprisingly simple. DTF (Direct to Film) printing is all about transferring designs from a special film onto fabric using heat and adhesive powder.
In this guide, we’ll walk through the complete DTF transfer process in a clear, human way, so you can understand every step and feel confident doing it yourself.
What Is DTF Printing in Simple Words?
Before diving deeper, let’s simplify the concept. DTF printing is a method where your design is printed onto a film, coated with adhesive powder, cured, and then transferred onto fabric using heat. That’s the full DTF printing process guide in one sentence, but each step matters more than you think.
Step 1: Preparing Your Design File
Everything starts with your artwork. A clean, high resolution design ensures a sharp final print. Use transparent backgrounds and proper sizing. This is where your DTF transfer for beginners journey begins, getting the design right. A strong design setup lays the foundation for the entire DTF transfer process.
Step 2: Printing on DTF Film
Once your design is ready, it’s printed onto a special PET film using DTF ink. The printer applies color first, then a white ink layer on top. This white layer helps the design stand out on all fabric types. This step is a core part of any DTF printing process guide, and accuracy here affects the final result.
Step 3: Applying Adhesive Powder
After printing, adhesive powder is applied to the wet ink. The powder sticks only to the printed areas, forming the glue that will bond your design to the fabric.
Important Tips
- Apply powder evenly
- Shake off excess powder
- Avoid clumps
This is one of the most critical DTF pre press steps that ensures strong adhesion later.
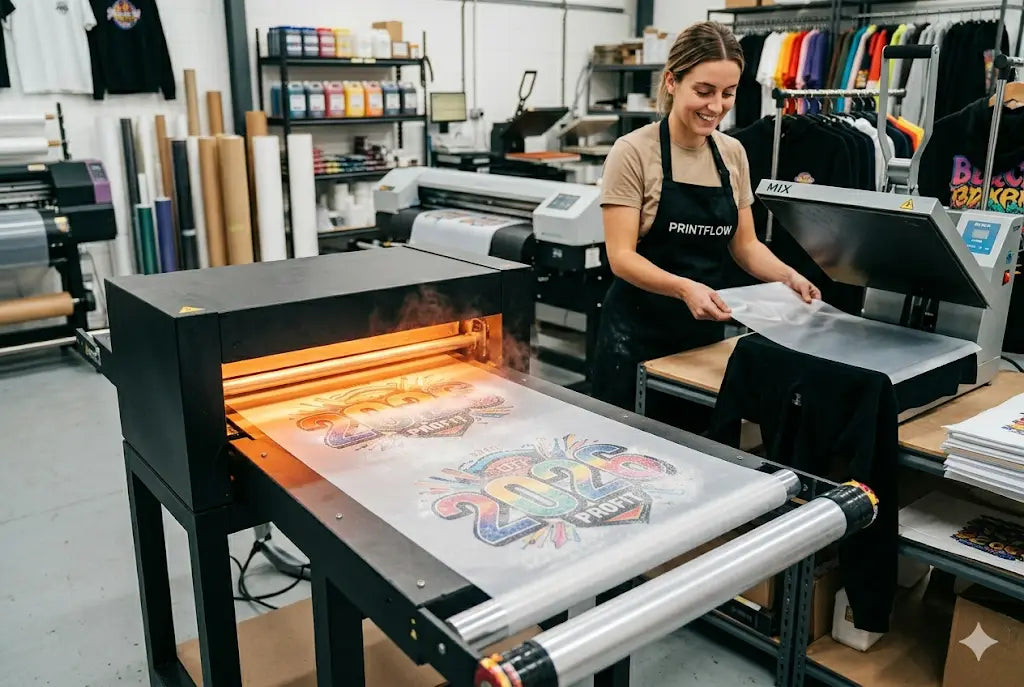
Step 4: Curing the Printed Film
Now comes the curing stage. The powdered film is heated to melt the adhesive and prepare it for transfer. Understanding curing DTF inks explained helps you avoid common mistakes like under curing or over curing.
Key Points
- Use consistent temperature
- Follow proper timing
- Avoid overheating
This stage is also covered in every DTF curing technique guide because it directly impacts durability.
Step 5: Prepping the Garment
Before applying the transfer, the fabric must be prepared. Prepping garments for DTF includes removing moisture and wrinkles by pre pressing the fabric for a few seconds. This step ensures a smooth surface and improves bonding during transfer.
Some people confuse this with pretreatment in DTF printing, but DTF usually does not require chemical pretreatment like DTG.
Step 6: Heat Pressing the Transfer
Now it’s time to apply the design to the fabric. Place the cured film onto the garment and press it using the correct heat settings.
Recommended Settings
- Temperature: 150–165°C
- Time: 10–15 seconds
- Pressure: Medium to firm
Following the recommended DTF heat settings ensures proper adhesion and vibrant results. This is the most important step when learning how to heat press DTF transfers.
Step 7: Peeling the Film
After pressing, the film is peeled away, either hot or cold, depending on the type of film used. Peeling correctly ensures the design transfers cleanly without damage. This step completes the main DTF transfer Step-by-Step workflow.
Step 8: Final Press and Finishing
For best results, a second press is often applied after peeling. This improves durability, smoothness, and overall finish. It’s a key part of professional DTF prints finishing.
Final Press Tips
- Use a protective sheet
- Press for 5–10 seconds
- Maintain even pressure
This extra step gives your prints a soft and polished feel.
Common Mistakes Beginners Should Avoid
Even though the process is simple, small mistakes can cause big issues.
Avoid These Errors
- Uneven powder application
- Incorrect curing temperature
- Skipping garment prep
- Wrong heat press settings
- Peeling too early or too late
Avoiding these ensures your DTF transfer for beginners experience is smooth and successful.
Why DTF Transfers Are So Popular
DTF printing has become popular because of its flexibility and quality. It works on cotton, polyester, blends, and even dark fabrics without complex preparation. Understanding how do DTF transfers work helps you see why so many businesses prefer this method over others.
Tips to Improve Your Results
If you want better prints, focus on consistency. Use the same settings, test regularly, and refine your workflow. Following a structured DTF printing process guide ensures repeatable quality. Over time, you’ll master every step and produce professional level results.
Conclusion
So, how do DTF transfers work? They work through a simple but precise process of printing, powdering, curing, and pressing. When done correctly, the results are vibrant, durable, and professional.
If you’re ready to explore premium quality printing solutions and take your results to the next level, visit DTF West Coast.
FAQs
1. What type of film is used in DTF printing?
DTF printing uses PET film specifically designed for transfers. It holds ink and adhesive powder properly, ensuring smooth transfer and high quality results on different fabric types.
2. Can DTF transfers be stored for later use?
Yes, DTF transfers can be stored for later use if kept in a cool, dry place. Proper storage maintains adhesive quality and ensures consistent results when applied later.
3. Do DTF transfers crack over time?
High quality DTF transfers do not crack if applied correctly. Proper curing, pressing, and washing care help maintain flexibility and durability over long periods of use.
4. Is DTF printing suitable for beginners?
Yes, DTF printing is beginner friendly because it does not require complex pretreatment. With practice and correct steps, beginners can achieve professional quality prints easily and consistently.
5. How long do DTF prints last on garments?
DTF prints can last for many washes when applied properly. Strong adhesion, correct curing, and proper care ensure long lasting designs without fading or peeling over time.
6. Can DTF transfers be used on dark fabrics?
Yes, DTF transfers work well on dark fabrics because of the white ink layer. This base ensures colors appear bright and vibrant on any fabric color.
7. Do I need special software for DTF printing?
Yes, RIP software is commonly used in DTF printing to manage colors and print layers. It helps ensure accurate color output and proper white ink application.
8. What happens if curing is not done properly?
Improper curing can cause weak adhesion and poor durability. The design may peel, crack, or fade quickly, making correct curing essential for long lasting results.
9. Can I reuse a DTF transfer film?
No, DTF transfer films are single use. Once a design is transferred, the film cannot be reused because the ink and adhesive are already applied to the garment.
10. Is washing care important for DTF prints?
Yes, proper washing care helps maintain print quality. Washing inside out, using mild detergent, and avoiding high heat ensures the design stays vibrant and durable longer.
Share:
How to Increase DTF Print Vibrancy
What Is TPU in 3D UV DTF Printing and Why It Matters